-
Java - synchronized, wait, notify개발 2023. 2. 28. 12:17

멀티 쓰레드 환경에선 두개 이상의 쓰레드가 동시에 같은 데이터를 접근하는 경우가 발생한다.
public class ThreadTest {
    public void run() {
        for (int i = 0; i < 3; i++) {
            int finalI = i;
            Thread thread = new Thread(() -> {
                System.out.println("thread " + finalI + " starts");
                method("thread " +  finalI + " running");
            });

            thread.start();
        }
    }
    private void method(String msg) {
        System.out.println(msg);
        try {
            TimeUnit.SECONDS.sleep(1);
        } catch (InterruptedException e) {
            e.printStackTrace();
        }
        System.out.println(msg + " done");
    }
}
-------------------------------------------------------
thread 1 starts
thread 1 running
thread 0 starts
thread 0 running
thread 2 starts
thread 2 running
thread 1 running done
thread 2 running done
thread 0 running done
출력 결과물에 따르면 thread 0, 1, 2가 동시에 method 함수를 타고 있다. 지금 위 코드는 단순히 출력하는 코드만 있기 때문에 문제는 없지만 특정 인스턴스 값을 수정하는 경우 원하지 않는 결과를 얻게될 수 있다.,
synchronized
자바에서 동기화 문제를 관리하기 위해 synchronized 기능을 제공한다. 함수 앞에 synchronized 키워드를 붙이면 쓰레드 한개만 해당 함수를 실행하는 것을 보장한다.
public class ThreadTest {
    public void run() {
        for (int i = 0; i < 3; i++) {
            int finalI = i;
            Thread thread = new Thread(() -> {
                System.out.println("thread " + finalI + " starts");
                method("thread " +  finalI + " running");
            });

            thread.start();
        }
    }
    private synchronized void method(String msg) {
        System.out.println(msg);
        try {
            TimeUnit.SECONDS.sleep(1);
        } catch (InterruptedException e) {
            e.printStackTrace();
        }
        System.out.println(msg + " done");
    }
}
-------------------------------------------------------
thread 0 starts
thread 2 starts
thread 1 starts
thread 0 running
thread 0 running done
thread 1 running
thread 1 running done
thread 2 running
thread 2 running done
실행 결과 method 내의 작업이 모두 종료된 후 다음 쓰레드가 실행할 권한을 얻게 됐다.
wait, notify
wait 함수를 호출하면 다른 쓰레드가 notify() 를 호출하기 전까지 대기시키는 함수다. notify는 wait 상태에 있는 쓰레드를 깨우는 함수다. wait와 notify를 적절하게 활용하면 동기화 기능을 더 똑똑하게 사용할 수 있다,
두개의 Thread를 이용해 데이터를 보내고 받는 작업을 만들어보자. Sender와 Receiver 라는 두 쓰레드는 데이터 객체를 공유하고 여기에서 데이터를 주고 받는다. 아키텍처는 다음과 같다.

Data 클래스의 모습이다. recieve와 sender 모두 두개 이상의 쓰레드가 진입하지 못하게 synchronized 를 추가했고 전송 유무에 따라서 wait로 쓰레드를 대기한다. 다른 쓰레드가 notify를 호출하면 wait에서 벗어날 수 있다.
public class Data {
    private String packet;

    private boolean needSend = true;

    public synchronized String receive() {
        while (needSend) {
            try {
                wait();
                System.out.println("wakeup receive");
            } catch (InterruptedException e) {
                Thread.currentThread().interrupt();
                System.err.println("receive exception");
            }
        }

        String returnPacket = packet;
        needSend = true;
        notify();
        return returnPacket;
    }

    public synchronized void send(String packet) {
        while (!needSend) {
            try {
                wait();
                System.out.println("wakeup send");
            } catch (InterruptedException e) {
                Thread.currentThread().interrupt();
                System.err.println("send exception");
            }
        }

        this.packet = packet;
        needSend = false;
        notify();
    }
}
Sender
import java.util.concurrent.ThreadLocalRandom;

public class Sender implements Runnable {
    private final Data data;
    private final String[] packets;

    public Sender(Data data, String[] packets) {
        this.data = data;
        this.packets = packets;
    }

    @Override
    public void run() {
        for (String packet : packets) {
            data.send(packet);

            System.out.println("Send packet: " + packet);

            try {
                Thread.sleep(ThreadLocalRandom.current().nextInt(1000, 5000));
            } catch (InterruptedException e) {
                Thread.currentThread().interrupt();
                System.err.println("Thread Interrupted");
            }
        }
    }
}
Receiver
public class Receiver implements Runnable {
    private Data load;

    public Receiver(Data data) {
        this.load = data;
    }

    @Override
    public void run() {

        for (String receivedMessage = load.receive(); !"End".equals(receivedMessage); receivedMessage = load.receive()) {
            System.out.println("Receive packet: " + receivedMessage);
        }
    }
}
Main
public class Main {

    public static void main(String[] args) {
        Data data = new Data();
        Thread sender = new Thread(new Sender(data, new String[]{"a", "b", "c", "d", "End"}));
        Thread receiver = new Thread(new Receiver(data));

        sender.start();
        receiver.start();
    }
}
출력결과
Send packet: a
Receive packet: a
Send packet: b
wakeup receive
Receive packet: b
Send packet: c
wakeup receive
Receive packet: c
Send packet: d
wakeup receive
Receive packet: d
Send packet: End
wakeup receive
Receiver는 데이터를 받고 난 다음 바로 다음 데이터를 요청하고 Sender는 보낼 때마다 1 에서 5초 내로 랜덤하게 딜레이를 준다. 두 쓰레드의 요청 사이에 시간차가 있기 때문에 Receiver는 wait 함수에 항상 진입한다. 아래 출력 결과물을 보면 첫번째를 제외하고 두번째 패킷을 받기 전에는 wait 상태에 진입한 것을 확인할 수 있다.
while 문 안에 wait를 넣은 이유는 쓰레드가 notify를 받아도 실행 가능한 상태가 아닐 수 있기 때문이다. notify는 object monitor 내에 있는 쓰레드중 임의의 한개의 쓰레드만 깨운다. Main 클래스를 변형해서 sender가 두개인 상황을 만들어보자
public class Main {

    public static void main(String[] args) {
        Data data = new Data();
        Thread sender1 = new Thread(new Sender(data, new String[]{"a", "b", "c", "d"}));
        Thread sender2 = new Thread(new Sender(data, new String[]{"1", "2", "3", "4", "End"}));
        Thread receiver = new Thread(new Receiver(data));

        sender1.start();
        sender2.start();
        receiver.start();
    }
}
원래 로직이라면 sender1이 호출한 notify가 receiver를 깨워야 하지만 sender2를 깨울 수도 있다. 이 경우는 새로운 데이터를 보낼 준비가 되지 않은 상황이기 때문에 while 조건문에 걸려 다시 wait 에 진입하는 것이 옳다.
notifyAll
notify는 대기중인 쓰레드중 임의의 한개 쓰레드만 깨우는 반면 notifyAll은 모든 쓰레드를 깨운다.
Monitor
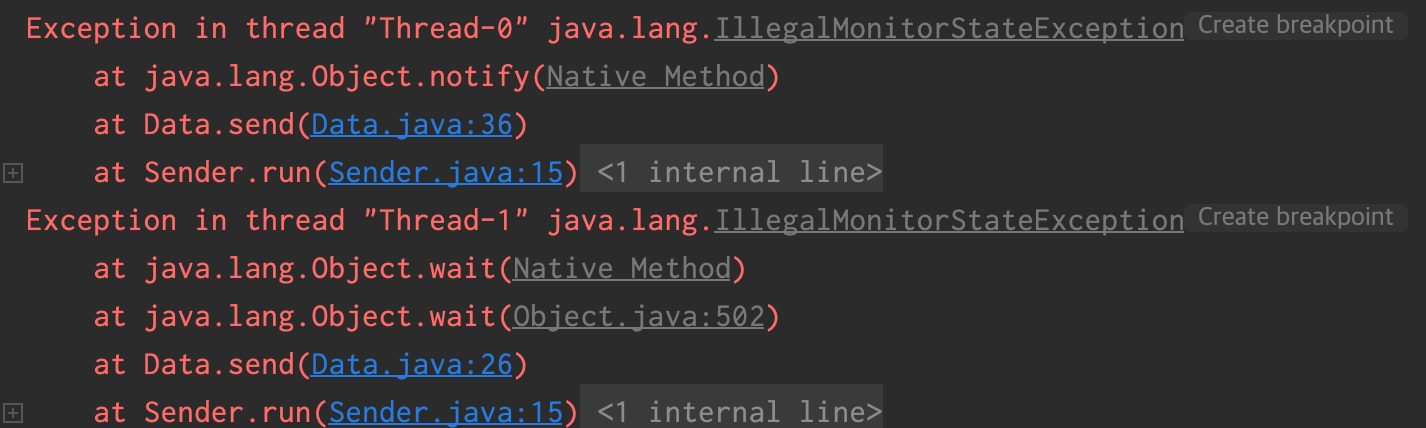
synchronized 가 없는 함수 내에서 wait, notify를 호출하면 IllegalMonitorStateException이 발생한다. 다른 쓰레드를 깨우거나 대기 상태에 들어가기 위해선 쓰레드가 monitor를 소유해야하는데 synchronized가 없는 함수에선 쓰레드가 monitor를 소유하지 않는다.
여럿이 모인 회의에선 원할한 의사소통을 위해 발언권을 가진 사람에게 말 할 권리를 준다. monitor는 발언권 같은 개념이다. 자바의 모든 객체는 한개 이상의 monitor를 소유하고 쓰레드는 synchrnoized 영역에 진입할 때 이중 하나를 차지한다. monitor를 소유한 쓰레드는 wait, notify 함수를 호출이 가능하다.
wait and notify() Methods in Java | Baeldung
Learn how to use wait() and notify() to solve synchronization problems in Java.
www.baeldung.com
"Monitor" in java threads
I have read different things in different blogs about monitors. So I'm a bit confused now. As much as I understand, monitor is a somebody who would make sure that only one thread is executing the...
stackoverflow.com
'개발' 카테고리의 다른 글
kubernetes - readiness, livenesss, startup probe (0) 2023.02.28 Java - Thread start, run (0) 2023.02.28 자바 - Garbage Collector (0) 2023.02.24 JAVA - 직렬화, 역직렬화 (0) 2023.02.24 Flask SQLAlchemy vs SQLAlchemy (0) 2023.02.14